By Steve Baughman
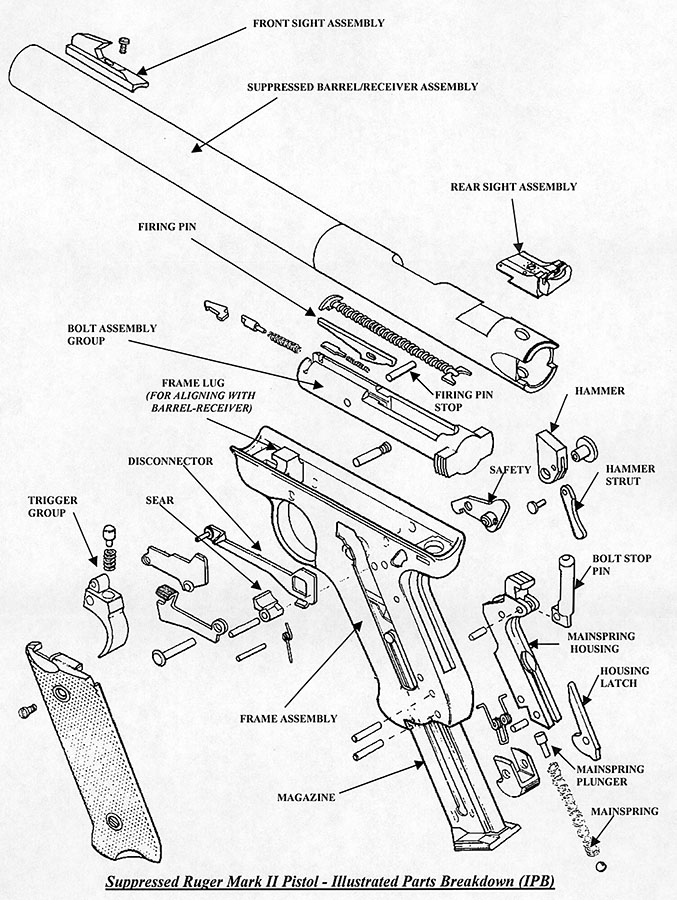
As far as pistols are concerned, the Ruger Mark II is obviously the industry standard these days for the Class II suppressor manufacturer. Integral units are either permanently sealed, or allow some type of access for removal and periodic cleaning of the internals. Eventually, if you shoot enough, the pistol is going to require extensive cleaning/maintenance to ensure that it is functioning correctly. Rimfire ammo is dirty, and it builds up and accumulates quite a bit of gunk inside the pistol that will eventually keep it from working at 100% reliability. Obviously the suppressor must be kept clean, but the rest of the pistol must also be maintained if you want it to work reliably. The suppressor itself usually encourages extra dirt to accumulate within the frame of the gun, which is often neglected. The Ruger manual discusses the gun breakdown and cleaning procedure, but the owner of the suppressed Mark II must take a few extra steps to maintain the gun. The Ruger manual is also a little difficult to read and interpret since the IPB identifies each part with a number, which has to be cross-checked with the nomenclature on the previous pages in the manual. The IPB illustration in this article identifies the guns main components with labeled nomenclature for clarity.
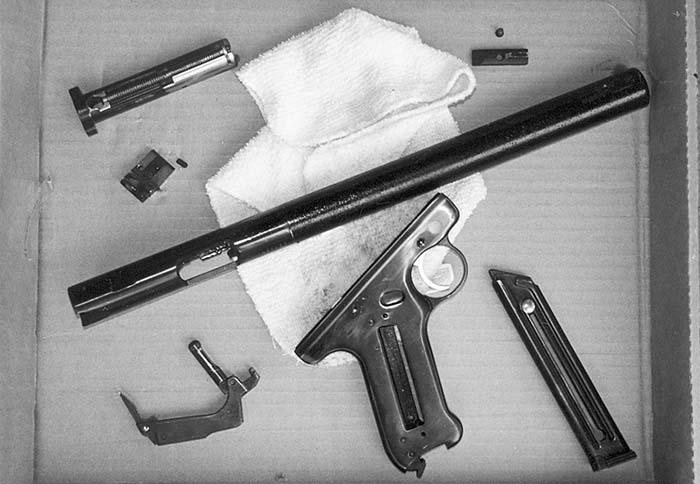
Once the standard Mark II is suppressed, the Ruger warranty is basically thrown out the window. I had one quit working for me a while back, and I called the Ruger repair center to see if they would rebuild the lower assembly without the barrel assembly being shipped with the unit. Ruger’s official response was “We cannot service the Mark II grip frame without the barreled receiver, and we cannot fit a barrel receiver to a grip frame, since this would create a new firearm (per BATF)”. So therefore, the owner who has a suppressed Mark II is basically on his own, as you would never want to ship a modified one to Ruger. There are probably as many different cleaning procedures as there are Mark II’s, so the following is my personal preference and can obviously be modified to each person’s needs. I hate to clean my guns, and usually never do until they stop working. Trust me on this, if you shoot a Mark II long enough, it will stop working. It may be as little as 2000 rounds, but when it does, it will probably not work properly unless it is broken down and cleaned in what I call “depot level maintenance”. The entire process takes a day or two, but is relatively easy if you take the time to do it properly.
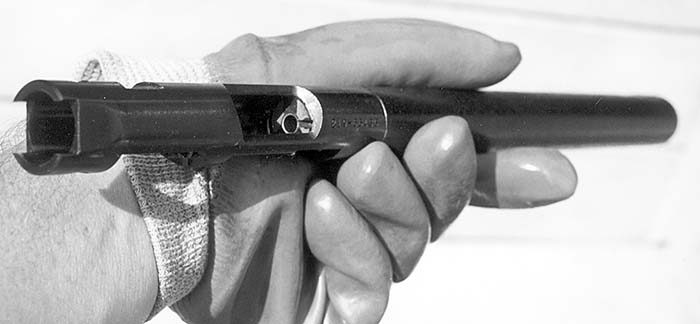
On the subject gun, the trigger pull had started feeling strange and was taking longer pulls to get the hammer to drop. Finally, the hammer failed to fall no matter how hard I pulled on the trigger. Spraying the internals with Breakfree did not loosen things up, and the hammer still refused to fall. To disassemble this gun, the mainspring housing must first be removed. Before the mainspring housing can be removed, the hammer must be in the forward (or fired) position. Well, because the hammer refused to drop no matter what I tried, I had to get the gun apart to see what was going on. Even with the hammer in the cocked position, the bottom third of the mainspring housing will pop out of the frame exposing the housing latch pivot pin. This pin was removed to allow the mainspring, mainspring plunger, and detent ball to be removed. Once the spring pressure was removed from the hammer strut, the hammer released and fell forward, allowing the mainspring housing to be removed. The rest of the disassembly went normally. Careful inspection inside concluded that the sear was not releasing the hammer. Apparently, the disconnector and sear were not operating properly due to lead shavings and other crud, which had deposited itself along the sear surfaces. This area of the gun is extremely hard to get to, and a thorough soaking and blasting with carburetor cleaner would be part of the process to clean it out.
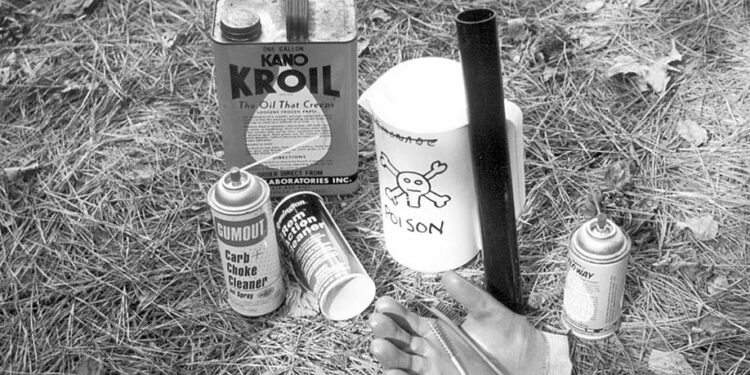
I do not have a parts bin cleaner, but it would certainly be a handy item to have for the following procedure. Some of these cleaning units are fairly expensive, so I chose the poor man’s route. If you are like me and do not have one, a soaking container can be cheaply made which will allow you to soak the barrel and frame assembly. I made a PVC soaking container for the barrel assembly unit, and used an old plastic jug for the frame assembly. The subject pistol was a sealed integral type, and the same procedure should apply to units that can be disassembled. The following summarizes my process of depot level maintenance of the suppressed Ruger Mark II pistol. I recommend the following list of items to have on hand before starting:
List of tools/other items:
*Cleaning brushes
*22 caliber chamber brush
*Screwdriver set (for removal of frame grips and, if required, front/rear sights)
*PVC tubing (“soak tube” container for the barrel assembly)
*Kroil Lubricant/Penetrant
*Floway Degreaser (spray aerosol and liquid solution)
*Carburetor cleaner (spray aerosol)
*Breakfree Lubricant
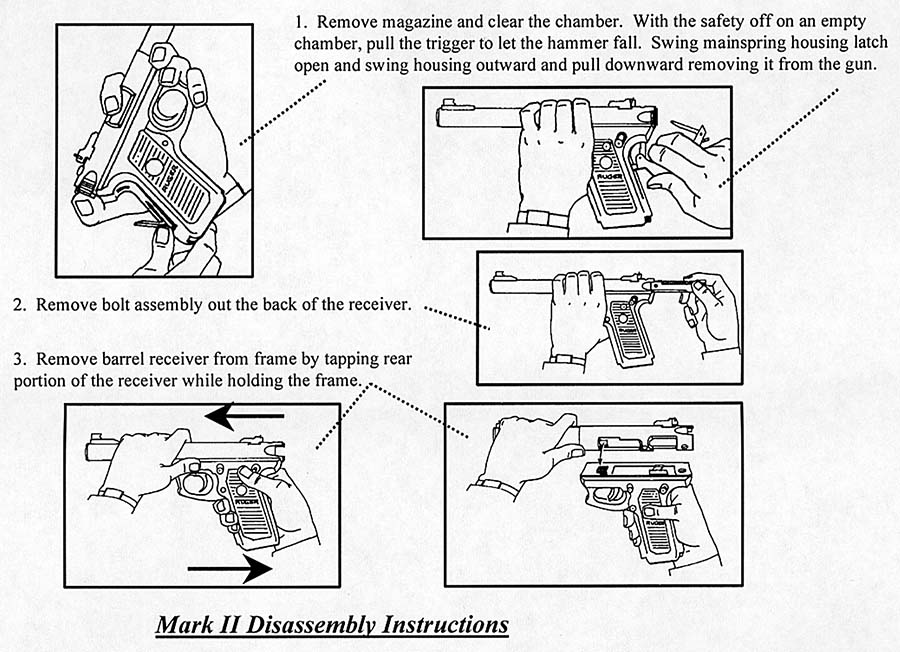
Disassembly (refer to IPB and Disassembly illustrations):
1. Remove the magazine and clear the chamber. With the safety off on an empty chamber, pull the trigger to let the hammer fall.
2. Swing the mainspring-housing latch open (I carefully use a small screwdriver to pry it open), then swing the housing outward and pull downward removing it from the gun. One may have to use a nylon mallet and tap the top of the bolt stop pin to remove it.
3. Pull the bolt assembly out the back of the barrel receiver. I do not take the bolt assembly apart normally as part of the cleaning procedure.
4. To remove the barrel receiver from the frame, it is usually necessary to use a plastic or rubber hammer. While holding the frame, strike the rear portion of the receiver to dislodge it from the lower assembly.
5. If so desired, remove the setscrew from the rear sight, and tap the rear sight to the right to remove it from the barrel.
6. If so desired, remove the setscrew from the front sight to remove it from the barrel.
7. Keep all parts in a box or bin to ensure that none are lost.
8. Remove the 4 screws attaching the grips to the frame.
Cleaning procedure:
(Warning: many older suppressors on the Ruger pistols and rifles were packed with fiberglass- as in that pink building insulation. The soaking procedures described here will not work well with these units. If you have one of these whose performance has been degrading, you should contact a Class 2 manufacturer to find someone to rebuild the unit with a more modern technology)
1. Soak the complete frame, bolt, and suppressed barrel assembly overnight in the containers with a mixture of 1/2 Kroil and 1/2 Floway (available from Kano Products).
2. The next morning, take the units out of the containers, and scrub off excess crud with a nylon brush.
3. Blast all internal areas with aerosol carburetor cleaner and Floway.
4. Re-soak units overnight in containers.
5. Remove units and blast with spray carburetor cleaner. Allow the barrel assembly to drain muzzle downward for an hour, or blow out with compressed air.
6. Clean the barrel chamber while the gun is apart using standard cleaning procedures.
Lubrication:
1. Use a small amount of Breakfree on the moving parts of the bolt assembly and trigger group, sear, etc.
2. If removed, place a small amount of removable Locktite on front and rear sight set screws prior to installing them to the barrel assembly.
3. When ready for final reassembly, I mix up a small amount of two-part epoxy, and place 1 drop in the frame lug recess in the barrel assembly. My particular Ruger has some slop at this interface, so the epoxy fills the recess to ensure that there is no side-to-side movement between the barrel and the frame after assembly. The area must be free of any oils or solvents prior to applying epoxy.
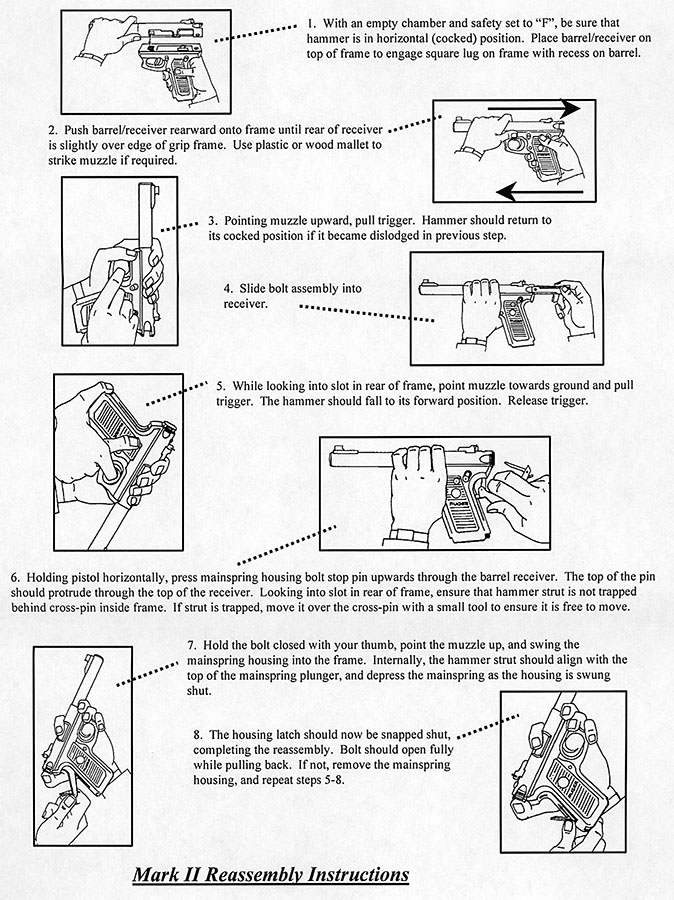
Reassembly (refer to IPB and Reassembly illustration):
1. With an empty chamber, place the hammer in the horizontal position.
2. Place the barrel on top of the frame, pressing it backward and downward so the frame lug engages the recess in the barrel.
3. Usually, some persuasion with a plastic or wood hammer is required to ensure that the barrel assembly is fully seated into the lower frame.
4. Pointing the muzzle upward, pull the trigger to be sure the hammer is in the cocked position and the hammer strut is hanging free.
5. With the muzzle pointing still upwards, slide the bolt into the receiver.
6. Point the muzzle towards the ground and pull the trigger so the hammer falls.
7. Now comes the fun part…. install the mainspring housing up and through the holes in the receiver. As the bolt stop pin is pushed up through the receiver, it also passes through the bolt. As you swing the mainspring towards the frame, be sure that the hammer strut is positioned so it comes to rest on top of the mainspring plunger as the housing is closed.
8. Once the proper alignment between the hammer strut and mainspring plunger is attained, press the mainspring housing into the frame and close the housing latch.
9. Reinstall the grips.
The final touches…
The only item left to check is the magazine. With the follower depressed, I use a brush to scrub the wax and lead buildup along the insides, with emphasis on the front side. The skinny GI brushes for the M16 work perfectly to reach down into the magazine. This small task is often overlooked, but is necessary to ensure reliable upward feeding of rounds.
Testing…
Test fire the gun to ensure that it is functioning properly. Readjust sights as required. After a thorough cleaning, the gun is quieter than it was before due to the internal oils that remain to vaporize and help quiet things down. Maybe mine will go another 20,000 rounds before it needs any depot level maintenance – time will tell. Cleaning the suppressed Mark II pistol is not overly complicated, but when it needs it, it really needs it. Once a year or whenever required, the proper maintenance should ensure your investment in a quiet shooter will last a long, long time.
Sources:
Sturm, Ruger & Co. Inc.
200 Ruger Road
Prescott, AZ 86301-6181
Kano Laboratories
1027-R Thompson Lane
Nashville, TN 37211-2627
| This article first appeared in Small Arms Review V2N7 (April 1999) |


