By Robert G. Segel
Most owners and operators of both the full auto and semiautomatic series of the .30 caliber Browning machine gun know of the difficulties in removing and reinstalling the driving spring and driving spring guide rod in the bolt. What most don’t realize is the ever present danger that these two parts represent.

When stripping the Browning and removing the bolt, the driving spring is compressed and locked in the bolt by the driving spring guide rod. The guide rod, under pressure, gets locked into the bolt by two little studs attached to the end of the guide rod that get turned just a quarter turn to lock the guide rod into two small recesses inside the bolt. These studs have been known to fail and when that happens the guide rod becomes a missile that can do great bodily harm to you or to someone nearby. The same result can happen if the guide rod has not been fully turned that quarter turn and seated correctly and the studs slip out of their recesses. The velocity is enough that if hit squarely in the chest, a cracked sternum and heart failure can occur, and, if hit in the eye area, besides blindness, is enough to actually enter the brain causing severe injury, or death. It is, in effect, like a loaded gun, and the rear of the bolt with the guide rod under compression by the driving spring should always be pointed in a safe direction, whether on the work bench or at the range.
The guide rod and driving spring should always be removed when the bolt is out of the gun, making the bolt “safe,” so as to not have to worry about where its rear is pointing, thus allowing one to concentrate better on the job at hand such as setting headspace, checking sear spring tension, firing pin protrusion, cocking lever action or cleaning. Additionally, if the bolt is stored out of the gun (always a good security precaution), the spring should not be kept compressed inside the bolt.
There are many hazards in removing and installing the guide rod under tension. Besides the danger of a parts failure of the guide rod studs breaking, or the guide rod is improperly seated, the screwdriver, coin or cartridge rim you are using to push the guide rod in or out under pressure can slip causing the guide rod to fly backwards at a great velocity. Additionally, trying to compress the long driving spring into its “well” in the rear of the bolt can cause the spring to kink, affecting operation. These problems have been endemic to the operators of Brownings since its inception: until now.

Often, the simple solution escapes everyone and it took 90 years for someone to recognize the problem and provide an easy and safe answer to it.
Dolf Goldsmith, world renowned authority on Brownings, has often warned of the dangers that the guide rod and driving spring represent. To that end, has devised a simple disassembly/reassembly tool consisting of just two parts that is easy to use to remove and replace the guide rod and driving spring safely. In this he was assisted by his friend, Gordon Harris.
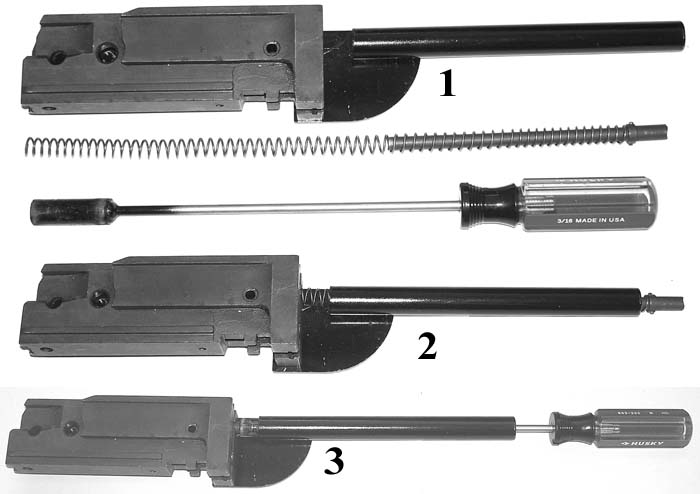
This disassembly/reassembly can be accomplished with the internal bolt parts in place or removed. The two parts consist of a securing plate with two bolt guide studs and a spring/guide tube and a driving tool with a special cup that is affixed to the end of the guide rod.
Using the Tool
Instructions for using the Browning Machine Gun Bolt Driving Spring and Driving Spring Guide Rod disassembly/assembly tool are simple.
- 1) After removing the bolt from the gun, to disassemble the driving spring and the guide rod from the bolt, remove the extractor and place the bolt by its cocking handle hole and its extractor hole over the two pins of the bolt securing plate with the rod aligning with the tube.
- 2) Insert the driving tool through the tube and against the end of the guide rod, twist it to ensure the blade is in the slot at the end of the rod and give it a quarter turn in a counterclockwise direction until it can be felt that it is loose. Ease the guide rod and spring out through the tube under spring pressure.
- 3) To assemble, proceed as in 1) above, and insert the spring and the guide rod in the tube of the securing plate and into the bolt.
- 4) Place the driving tool against the slot in the end of the guide rod, and make sure it locks into place. Then, by pressing against the handle, compress the spring inside the tube. Push it all the way in until it stops, then give the driving tool handle a quarter turn in a clockwise direction to lock the small studs on the guide rod into their recesses in the hole at the rear of the bolt. Make sure by feel that the guide rod is turned all the way and that the studs are inside their recesses, and that the guide rod stays in place inside the bolt. While doing this, keep a firm grip on the driving tool handle so that the spring and guide rod cannot “escape.” The spring and its guide rod are now assembled into the bolt, which can now be lifted off of the securing plate and the extractor replaced.
Caution
Remember, once the spring and the guide rod are locked inside the bolt, NEVER look at the bolt from the rear and always keep the rear of the bolt pointed in a safe direction. The assembled unit must be handled with the same care as one would give a loaded handgun with a hair trigger. It is possible for the driving spring rod to not be fully engaged and slip, also, the small pins holding the guide rod in the bolt have been known to fail. People have been injured and even blinded and caution is of paramount importance.
This disassembly/assembly tool should be in every Browning owner’s tool kit. The tool can be used with the bolt assembled or stripped. Not only does it ease the removal and insertion of the driving spring and guide rod, it has the added benefit of introducing a much needed safety factor for the process.
The Browning machine gun bolt driving spring and driving spring guide rod disassembly/assembly tool can be ordered from Dolf Goldsmith, Long Mountain Outfitters, LLC or ask your local Class III dealer. The cost is just $69.95 with shipping and handling included.
Source:
Dolf Goldsmith
P.O. Box 791870
San Antonio, TX 78279
Long Mountain Outfitters, LLC
631 N. Stephanie St., #560
Henderson, NV 89014
Phone: (702) 564-0948
Fax: (702) 558-1728
| This article first appeared in Small Arms Review V11N12 (September 2008) |


