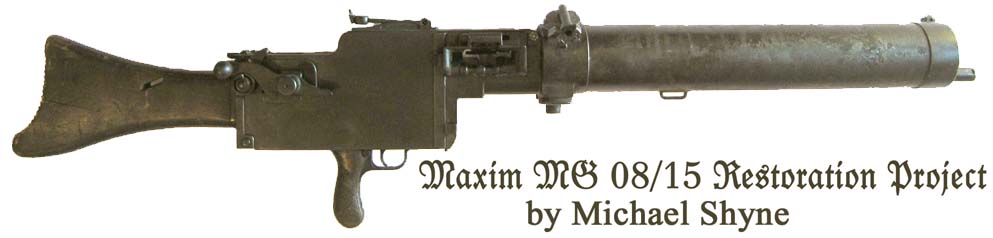

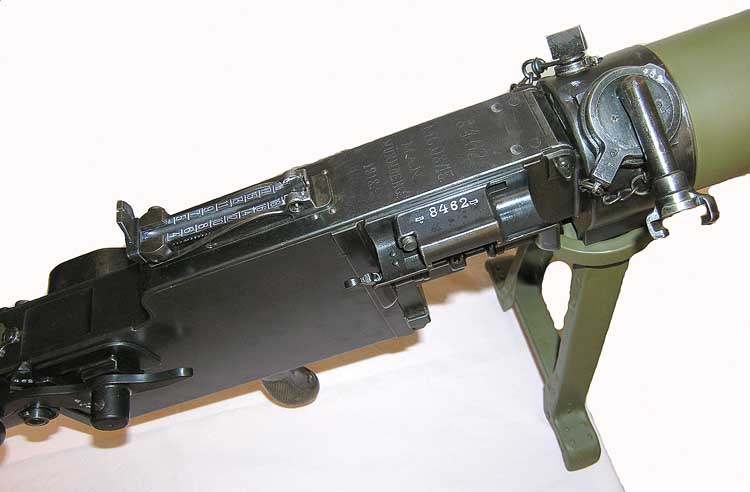
The author’s 08/15 Maxim machine gun spent decades in the corner of a garage. Its accumulated surface rust looks worse that it is. Locating replacements for the lost parts, probably from children playing with it over the years, may be a bigger challenge than the rust.
It is possible that more 08/15 Maxim machine guns are registered in the National Firearms Registration and Transfer Record (NFRTR) than any other type machine gun brought back to America from the battlefields of our nation’s history. Their mechanism is ingenious. For the quantity manufactured, their quality of workmanship is unsurpassed. They are a controllable and enjoyable machine gun to shoot. Yet most 08/15 Maxim machine guns are unappreciated, dirty and rusty, resting in some dark space and accumulating more dust from each year of their neglect. It is time to bring these Maxims back to life.
Even if the specific history is lost for most of the Maxim machine guns registered on the NFRTR, they will provide their owners with pride of ownership if given the attention they deserve to bring them back to life.
Restoring a machine gun calls upon the owner’s wisdom to know if it should be restored or left as-is. Restoration requires a commitment of time and patience. If the Maxim is to be reactivated, that process may have legal considerations that must be carefully addressed. Restoring that gun may compromise its value and desirability if the history of the firearm is well documented and significant. It may be better to leave that unique specimen just the way it is. Every war trophy has its own history. Sadly, few veterans documented their war trophy’s history, and even when it was put in writing, time and carelessness have often caused the gun and its history to go separate ways. So it is very likely the dusty, rusty war trophy you have will only be improved with a careful and patient restoration.
It is important to mention that the Maxim machine gun is a complicated piece of firearms technology. This article can only address basic descriptions of parts and assemblies. If you find the mechanism of the Maxim machine gun intriguing, you may thoroughly enjoy the Armorer’s/Operator’s class taught by Long Mountain Outfitters, devoted specifically to Maxim, Vickers and Lewis machine guns. Its instructors have developed their knowledge from decades spent working with these remarkable inventions. You will leave that class with a depth of knowledge articles like this can never provide.
If you are going to move forward with this restoration plan, make certain you have an adequate block of time to complete the project. We all have started a project, disassembled the mechanism, set the project aside before completion due to other priorities and ended up forgetting how to reassemble it, or, worse yet, losing some of its pieces. This author spent 22 hours on the restoration featured in this article. If his specimen had more rust, it would have required substantially more time.
The author’s specimen was a Deactivated War Trophy commonly called a “Dewat.” Since the goal of this project was to restore the gun to shooting condition, doing so will require a change in the status of its registration on the NFRTR. Study the registration papers of your machine gun. If it is described as a “live” machine gun, it is not a Dewat. If your registration form asks “Is the firearm unserviceable?” the “yes” or “no” answers this question. If the registration describes how a part of the gun was welded up, it is a Dewat. If you’re specimen is a Dewat and you intend to reactivate it to shoot, the first question you need to ask is “does the state, county and municipality I live in allow me to own a live machine gun?” Consult a class three dealer in your state and research the question on the web to confirm what the dealer told you. The answer to this question affords no room for error.
Although most readers of this article may not own a 08/15 Maxim machine gun or any other war trophy machine gun, these treasures are more plentiful than you may think. The author chose the 08/15 Maxim because of this model’s abundance. The United States government returned a huge quantity of Maxims to America during and after World War I, possibly intending to convert them to 30-06. Kent Lomont, well known machine gun expert and owner of Lomont Precision Bullets, has told the author he had documented evidence that during the war, examples of the 08/15 Maxim were given to donors making substantial contributions to the war effort. After the war they were distributed to VFW’s and American Legion posts. The Amnesty of 1968 legalized thousands of war trophies when they were registered on the NFRTR.
This article addresses the 08/15 Maxim. However, the procedure is applicable to any other machine gun or Title I firearm that can benefit from restoration. The word “restoration” has many degrees of definition. The firearms industry includes restoration experts able to restore a derelict firearm into an example that looks like it just left the factory. The degree of restoration addressed in this article can be achieved by individuals with reasonable mechanical skill, using readily available tools. The intent of this restoration is to clean up and highlight the firearm’s basic condition. No attempt will be made to address firearms rebluing. The author welcomes someone with more expertise to share his secrets for cold and hot rebluing.
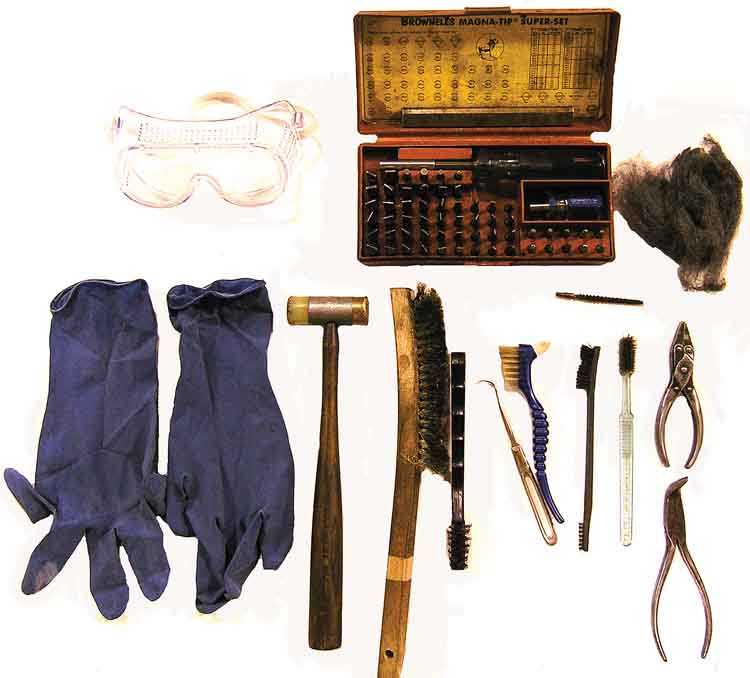
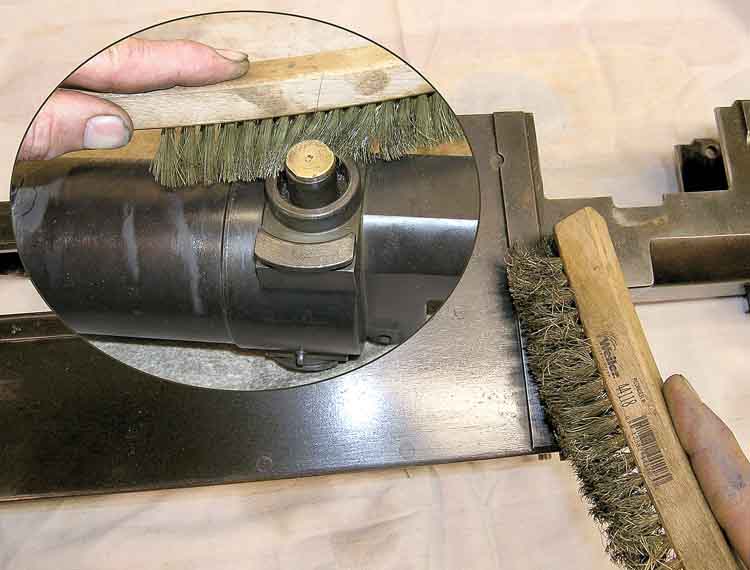
Using the correct tools will make this project easier. Fortunately, only simple tools are required. To disassemble the machine gun, the author used a good set of screwdrivers, a pair of standard pliers and a pair of needle nose pliers, a brass punch and a small brass hammer. Brass tools are used to impact gun parts because brass is softer than steel and will allow the tool to deform before the gun part is damaged. To clean the gun, the author used large and small brass bristled brushes, toothbrushes, a sharp pointed tool to remove grease from tight spaces, number 400 steel wool and a one inch wide putty knife. A clean pair of safety goggles is necessary to keep chemicals and small particles of rust and dirt out of your eyes. Some people experience skin irritation from various cleaning chemicals, so a good pair of rubber gloves is important as well. Avoid breathing the fumes of these chemicals by working in a ventilated area. Bright lighting will be helpful when inspecting parts and evaluating the degree of success of your work on the metal surfaces.
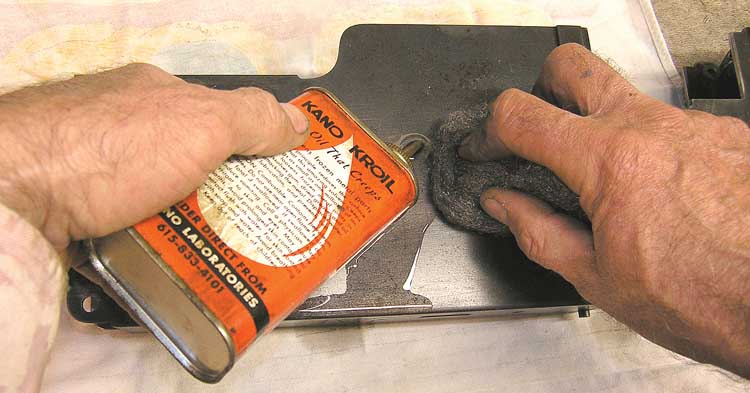
Specific chemicals are necessary for removing grease and oil, lifting rust and lubricating the final product. You may already have your preferences. Carburetor and choke cleaner, available at automobile parts stores, is effective for removing grease and oil. To lift rust, the author used Kano Kroil. However Hoppe’s #9 Powder Solvent, Liquid Wrench, Marvel Mystery Oil and even kerosene will also work well. Never use gasoline, camp stove fuel or white gas. Although everyone has their favorite product, the author used Break Free to lubricate parts and give metal surfaces a protective coating after they were cleaned.
The last and possibly most useful “tool” is good reference material. In the case of the 08/15 Maxim machine gun, the best source of information known to the author is Dolf Goldsmith’s fine book: The Devil’s Paintbrush-Sir Hiram Maxim’s Gun, published by Collector Grade Publications. If you are restoring a different firearm, find the appropriate reference material. Disassembly and reassembly of the firearm creates the possibility of breaking old and sometimes irreplaceable parts of the gun, particularly if you are even slightly unfamiliar with the firearm at hand. The author has owned eight Maxim machine guns and still managed to break a part! Consider the cost to purchase reference material as an insurance policy, much more economical than the damage possible from inexperience. Although some Maxim parts have multiple names, this article will use nomenclature consistent with The Devil’s Paintbrush.
Once you have set aside adequate time, located an appropriate place to do the work, assembled the tools, chemicals and the lighting, studied the reference material and assured yourself you have adequate patience, the project is ready to start. The obvious first step is disassembly of the machine gun. Remembering how the small parts of machine guns go back together seems do-able while you are taking them apart. Don’t count on it! Today’s technological advancements make for improved “memory.” Digitally photograph every component and parts group before disassembly. Some parts fit back together in more than one configuration, but only work one way.
The machine guns registered on the NFRTR fall under one of two categories of operability: live or deactivated. If you’re machine gun is registered as a live or serviceable firearm, move on in this process. If it is registered as deactivated or unserviceable and you intend to leave it that way, move on. However, if it is unserviceable, registered as a deactivated war trophy – a Dewat – and you intend to make it into a live machine gun, BATF&E laws and regulations must be complied with before reactivation of the firearm.
The first step of the reactivation process is to conclusively establish if you can legally own a live machine gun in your state, county and municipality. If the answer is “yes,” you have two choices. You can employ a licensed machine gun manufacturer in your state to reactivate your machine gun or you can do it yourself.
If you chose to employ a licensed machine gun manufacturer, ATF Form 5 (Application for Tax Exempt Transfer and Registration of Firearm) must be filed and approved by ATF prior to delivering the machine gun to the manufacturer. This is a tax exempt transfer because at this point, the machine gun is unserviceable. Upon receipt of the approved Form 5, the machine gun can be delivered to the manufacturer. The licensed manufacturer will then complete the reactivation and file ATF Form 2 (Notice of Firearms Manufactured or Imported) to re-register the machine gun as a live machine gun. After approval of Form 2, the manufacturer will submit ATF Form 4 (Application for Tax Paid Transfer and Registration of Firearm) plus the required $200 tax, re-conveying the live machine gun back to you, its owner. Delivery of the machine gun to you may take place only after receipt of approval of this final Form 4. The machine gun manufacturer you work with should be willing to prepare all forms and other paperwork you will need to complete this process.
The alternative to employing a licensed manufacturer to re-register your machine gun as a live machine gun is for you, as its registered owner, to do it yourself. You must file ATF Form 1, (Application to Make and Register a Firearm) and perform the physical reactivation of the gun yourself. Form 1 plus a $200 registration tax must be submitted to BATF&E, and its approval received, prior to performing the reactivation process.
The Bureau of Alcohol, Tobacco, Firearms and Explosive’s website www.atf.gov is a helpful source for required documents.
If you are reactivating your machine gun yourself, only after receiving ATF Form 1 approval may you start the physical reactivation process. If you have not yet received an approved ATF Form 1, do not tempt fate with your impatience. The consequences can mean jail time. Likewise, if you are filing ATF Form 1 to reactivate your machine gun, YOU MUST DO THE WORK ON YOUR MACHINE GUN YOURSELF, ON YOUR PREMISES. Do not contract out the work to someone else. Doing so has legal consequences far beyond the scope of this article. Just do it right!
When your machine gun was deactivated, the legal requirements called for a steel plug to be welded into the barrel chamber and for the barrel to be welded to the receiver so that it could not be readily removed and replaced with an operational barrel. Welding the chamber solid to prevent it from accepting a cartridge was a straightforward process. However, the means of securing the barrel to the receiver so that it could not be readily replaced, may have been completed in a variety of ways. Generally, the barrel was welded to the receiver. In the case of the 08/15 Maxim, this was achieved with more than one technique. Sometimes the barrel was welded to one of the barrel extension plates and that plate was welded to the receiver. An alternative was to braze the barrel’s threaded brass buffer ring to the receiver’s trunnion. (The trunnion is the complex part positioned between the receiver and the water jacket). An ingenious method the author witnessed was simply welding the feed block to the receiver. This prevented the barrel from being removed because the lower feed arm of the feed block prevented movement of the barrel extension. The point of describing multiple ways your machine gun could have originally been deactivated is to explain why this article can not specifically detail how to remove the welded impediment that prevents your barrel from being removed from the machine gun. You will have to study your example in order to ascertain what was originally done to deactivate it. Only then will you be able to decide what to do to reactivate it and what specific tools will be required. At this point you may want to reconsider employing a licensed manufacturer to reactivate your war trophy in order to have this sometimes-delicate step completed correctly.
One of the useful tools in this process is a Dremel tool, which can be purchased at many hardware stores. It may remind you of the tools dentists have used on us, although not quite as small. Selecting the appropriate carbide bit will make a big difference in ease of completion. Metal filings can be propelled into your eyes so always wear safety goggles when using a Dremel tool. Muster maximum patience and remove the slightest amount of metal weld with each stroke of the Dremel tool’s bit on the weld, until you have removed just enough of the weld to remove the barrel. Once the weld is removed, the Maxim crank handle assembly can be withdrawn from the receiver, removing the barrel with it. You can more neatly finish dressing down the remaining weld on the parts and the receiver after their disassembly when you have easier access to the critical areas.
If you do not feel comfortable performing this work yourself, worried that you may damage the gun more than the cost of the alternative, figure this out in advance of filing your ATF Form 1 and contract a licensed manufacturer capable of professionally completing the reactivation. The paperwork approval process may take more time, but you may be much more content with the finished product.

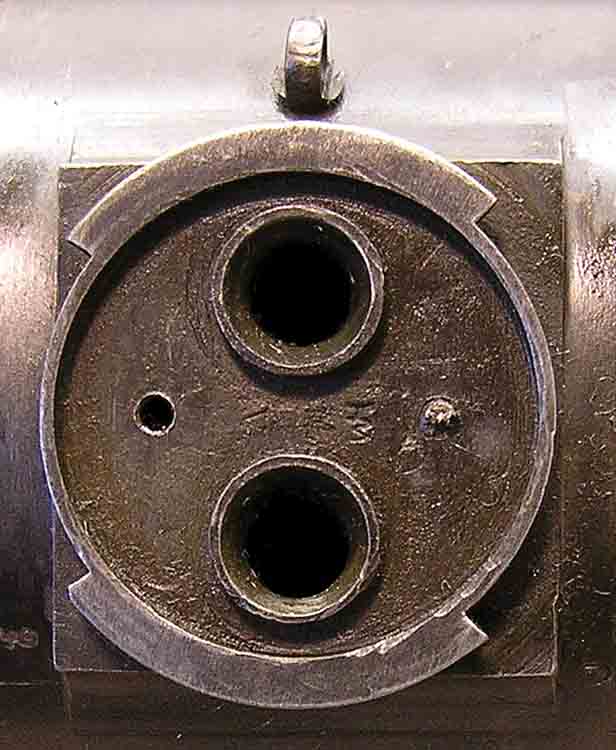
Now that the barrel is free, study how its chamber has been welded. You can measure the length of the internal chamber plug by inserting a cleaning rod into the muzzle of the barrel, marking its inserted length to reach the chamber plug. Then withdraw the cleaning rod from the barrel and compare that length to the overall length of the barrel. The difference is the length of the chamber plug. At this time, original Maxim barrels are available. The 08 Maxim and the 08/15 Maxim use the same basic barrel, with the exception that a muzzle sleeve is attached to the threads on the muzzle of the barrel when used in the 08/15 Maxim. Thus, an 08 Maxim barrel can be used by simply removing the muzzle sleeve from your welded-up 08/15 barrel and securely attaching it to the 08 barrel.
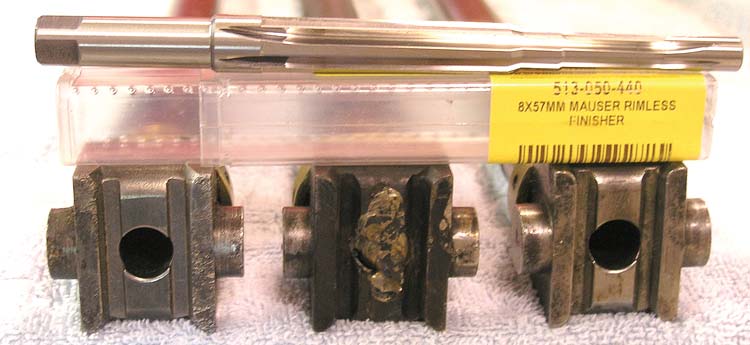
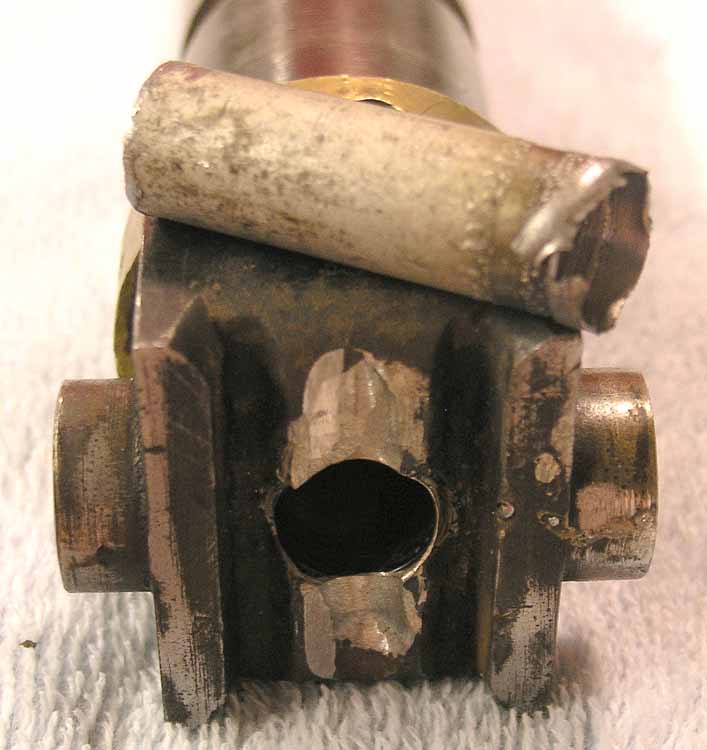
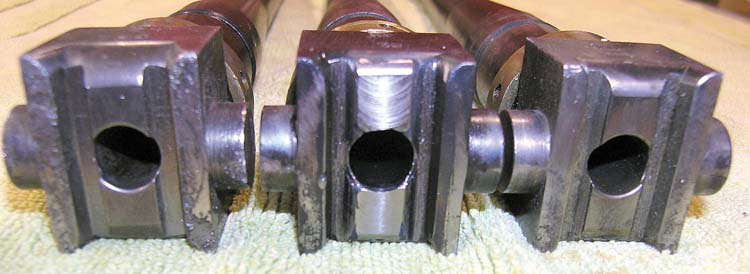
The quantity of available original Maxim barrels is diminishing, so you may choose to restore your welded-up barrel. Since only the receiver of a war-trophy machinegun is the registered part, restoring the barrel can be handled by a third party, a competent gunsmith/machinist. (Not all gunsmiths have machinist skills and equipment to perform lathe work). The best way for him to perform this is for you to provide him with the welded-up barrel and an original un-welded barrel to use as an example. The author chose to restore the welded-up barrel removed from his Dewat because it was the original barrel serial numbered to the gun. It was too important to discard and justified the gunsmith/machinist’s cost, which may exceed today’s cost of an original replacement barrel. With a serviceable example of a Maxim barrel in hand, the gunsmith/machinist will understand that the least amount of metal should be removed in order to remove the plug which was welded into the chamber. Depending upon the exuberance of the welder when the plug was welded into the chamber, the barrel’s chamber may be restored to shootable specifications without the need of a chamber reamer. In the case of the author’s barrel, significant metal had to be removed from the chamber and back surface of the barrel trunnion (the square block of steel forming the rear surface of the barrel) in order to remove the welded plug. After the plug was removed, the barrel was taken to an experienced welder and additional weld was applied to its rear surface. With the help of an 8x57mm Mauser finishing chamber reamer, the gunsmith/machinist was then able to restore the chamber to shootable condition and re-machine the rear surface of the barrel trunnion to match the un-welded example provided. Restoring a welded-up barrel may seem to be a lot of work and extra trouble. Eventually, original barrels will no longer be available and there will be no alternative.
When using the Dremel tool, you may have removed too much metal when grinding away the original weld, resulting in an unsightly gouge to the interior of the receiver. Please note that the receiver of this machine gun is the “registered part” and it is registered to you. It must always be in your possession or securely stored under lock and key to which only you have access. Speaking practically, it may be more prudent to overlook the damage you did to the receiver. Just dress it up the best you can and move on in the process. Do not ask others to work on your machine gun receiver. They are probably not knowledgeable of the legal aspects of machine gun ownership. Doing so is foolish and may have stiff legal consequences you are not ready to address.
In the likelihood that you are reading this article without having acquired and studied the additional reference material, in this case The Devils Paintbrush-Sir Hiram Maxim’s Gun, you may not be familiar with the nomenclature of Maxim machine gun parts. To learn the most from this article, understanding terminology is essential. The time and effort you put into building that understanding translates into the quality of workmanship your finished product will exhibit. The information and wisdom in Chapters 14 and 15 of The Devil’s Paintbrush are worth its purchase price.
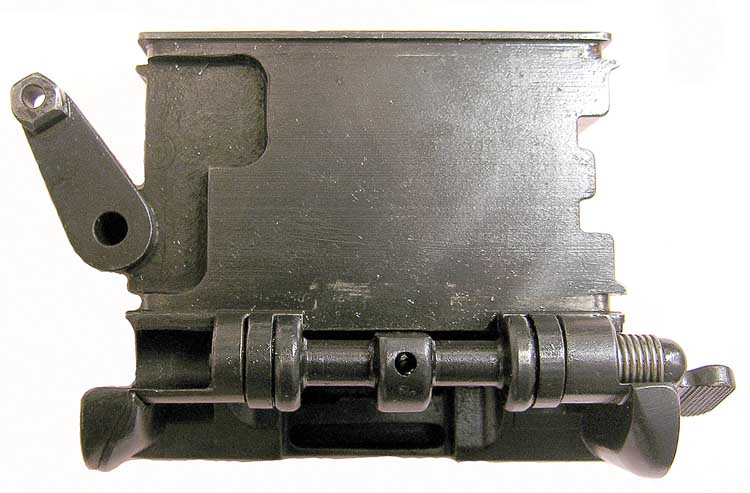
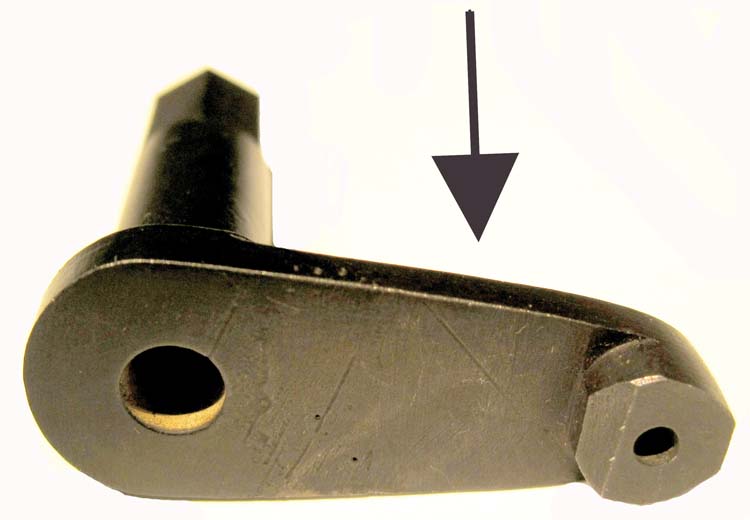
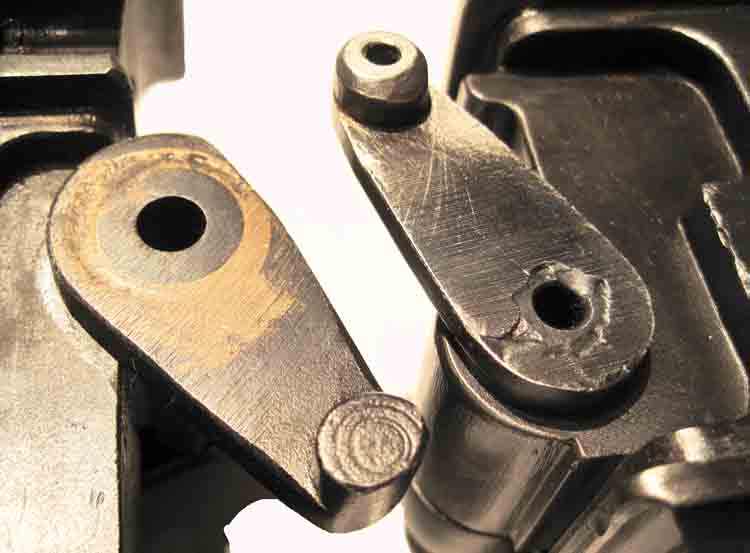
Several of the 08/15 Maxim machine guns acquired by the author have suffered from the same flaw: a broken lower feed arm on the feed block. The lower feed arm is positioned on the bottom of the feed block. A protrusion on the end of the lower feed arm fits into a notch on the left barrel extension plate, causing the feed block to advance the cartridge belt one cartridge each time the barrel extension cycles. For some reason, the end of the lower feed arm and its protrusion had been cleanly broken off on each of these three machine guns. Again, Kent Lomont provided an explanation. When our government returned a large number of Maxim machine guns to the United States after World War I, gifting them to appropriate civilian recipients, this part of the lower feed arms was broken off in order to prevent the machine guns from functioning as machine guns. Although this damage did not fulfill ATF requirements to become a Dewat machine gun, the lower feed arm will have to be repaired or replaced in order to allow the gun to function. If you are fortunate, you might locate an original replacement part. The alternative is to find someone knowledgeable enough to repair the broken lower feed arm. Periodically an advertisement has appeared offering the service. We all should have retained a copy of that ad.
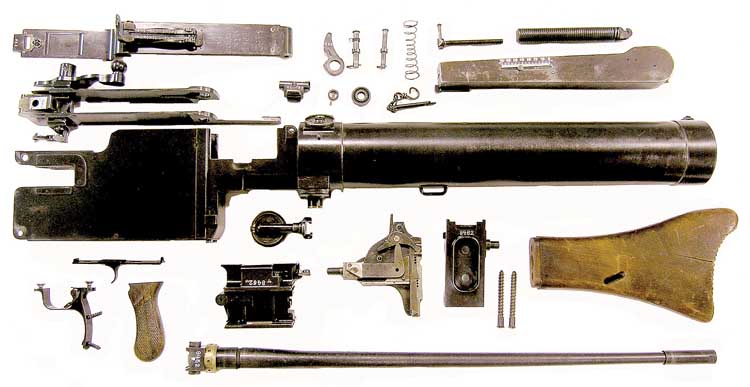
In order to thoroughly clean the Maxim machine gun, it needs to be disassembled. Chapter 14 of Dolf Goldsmith’s book The Devils Paintbrush describes the procedure to follow to field strip the MG 08 Maxim. The same procedure applies to the 08/15 Maxim.
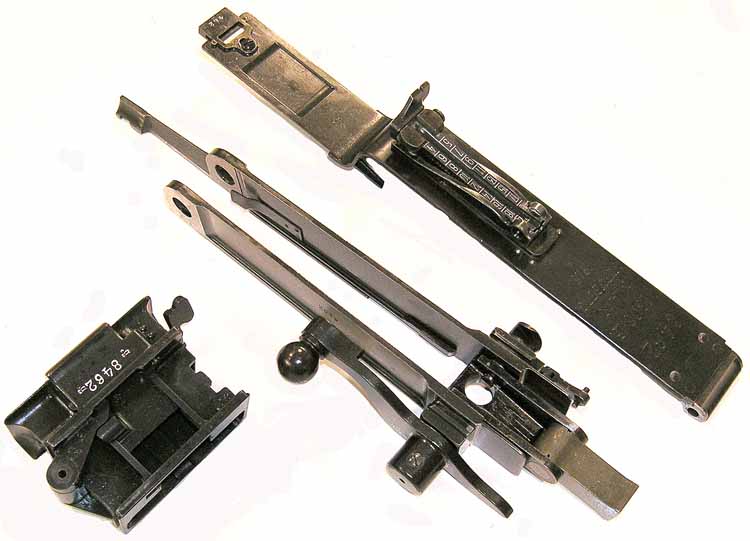
In this restoration, for the reasons given, the author chose not to completely disassemble five component assemblies, the feed block, sights, crank handle assembly, steam tube assembly and the lock. The feed block was left intact because its main component is still a complex shape with many irregular surfaces, so little was to be gained by disassembling this unit. In addition, after some tapping, the upper feed arm did not want to release the lower feed arm shaft and the author was reluctant to use more force on these 90-year-old parts. The sights are easy to clean in place.
The crank handle assembly includes the barrel extension plates with cross head, the connecting rod and the crank handle plus the somewhat delicate linked arm that attaches to the fusee spring. Forcing its disassembly could damage parts that are hard to replace, so this assembly was cleaned as a single unit.
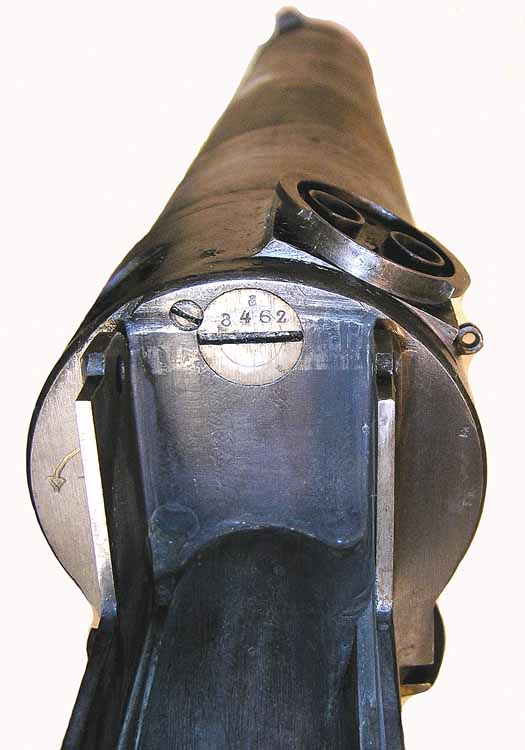
Inside the water jacket, running its full length and positioned above and parallel to the barrel, is the brass steam tube assembly. It is basically a sliding tube positioned around a smaller stationary tube. The steam tube assembly permits the steam buildup to escape from within the water jacket when the muzzle is elevated or depressed, without allowing the boiling water to also escape. Test your gun by pointing the muzzle upward and then pointing it downward. If you hear a “loose” part inside the water jacket, the sliding tube is functioning properly and the assembly does not have to be removed. However, if the sliding tube is not “loose”, the assembly will have to be removed to clean it. This can be done by unscrewing the small lock screw, and then unscrewing the steam tube disassembly plug, located on the back of the trunnion and visible when the top cover is removed from the receiver.
The final part the author did not intend to disassemble is the lock assembly. Its disassembly and reassembly are more complicated than disassembling and reassembling the entire gun. It can be cleaned and lubricated reasonably well without disassembly. Two main parts need to be checked, the firing pin and the firing pin spring. Doing so can be physically painful so exercise extreme care. To remove the lock from the receiver, retract the crank handle. This action moves the lock rearward and allows it to be tilted up and lifted out of the receiver. Rotating it 45° on its shaft allows it to be removed from the gun. Please note that at this point, the lock is cocked. Pressing the “trigger” on the lock will release its hammer, seriously squeezing any part of your hand which may be located at the point of the impact of the hammer. Hold the lock so that you can activate its trigger and keep clear of the hammer’s point of impact. While doing so, listen to the firing pin spring when the firing pin is released. If the spring sounds strong, the spring is probably in good condition. If it sounds weak, the lock was probably left in its cocked position for years and the spring needs to be replaced. After the hammer has been released, the tip of the firing pin should protrude through the firing pin hole. If it does not, as was the case with the author’s Maxim, it is broken and the firing pin needs to be replaced. If parts replacement is necessary, you have the option of searching for replacement parts and installing them following Mr. Goldsmith’s instructions, or purchasing a complete original lock, still available when you can find one.
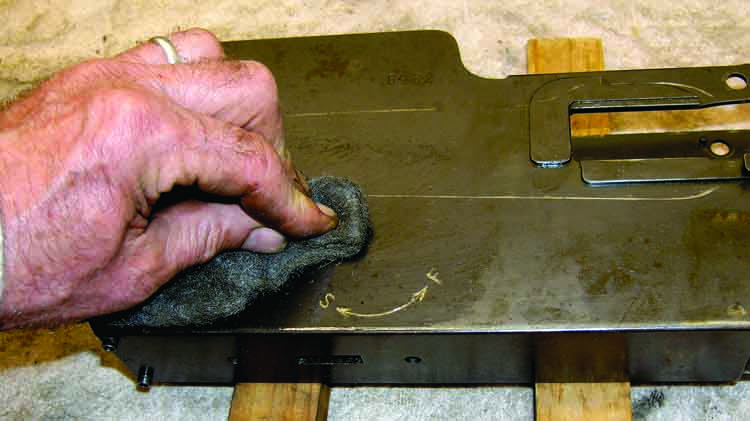
To this point, you have been confirming details of the law in your place of residence, making choices, handling legal issues, photographically documenting the original placement of parts and disassembling your gun. It is finally time to start the slow but rewarding process of restoring your Maxim’s metal surfaces. The easiest part to start with is the receiver, the boxy part attached to the water jacket. It’s large, flat surfaces are ideal for you to use to develop your technique. Most Maxims have remained in dirty but reasonably dry storage for decades. Their original deep blue surfaces may have turned brown from age and humidity. But this light rust has not pitted the metal surface. Inspect your receiver carefully, under a bright light. One of the 08/15 Maxims the author owned appeared to have been an outdoor exhibit for many years. The bottom surface of the inside of the receiver had deep rust pitting from water standing within the receiver. The exterior of the receiver had thick rust but no pitting. In spite of the condition of the inside of the receiver, this gun cleaned up nicely and functioned well. The exterior surface of the Maxim the author is currently addressing was covered with light rust. Under dirt and grime, the inside of the receiver still retained much of its original blued finish.
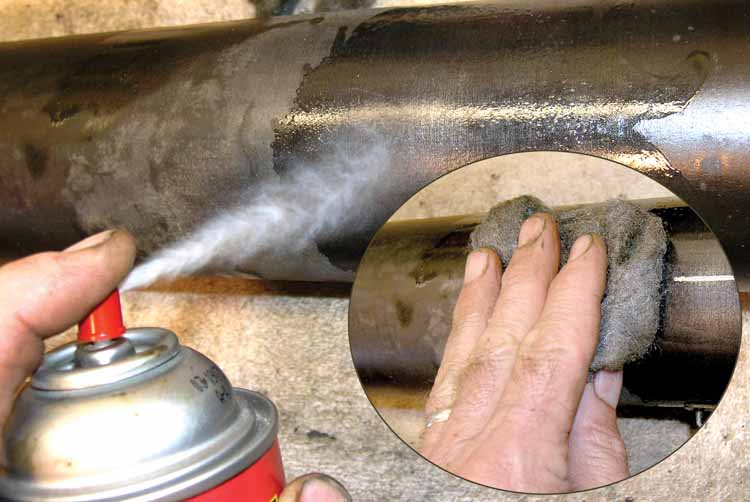
Arrange your receiver on your work area so that one of its large flat surfaces is horizontal. You will be putting pressure on the receiver, so make certain its underside is well supported with small boards or similar material. Apply the Kroil, or other product you may be using, to the surface and rub it in with the fine 400 steel wool. All you are trying to do is remove a light coat of surface rust. After working an area, wipe it clean with a dry rag and inspect the area under a bright light. With the penetrating oil, the light rust on the surface will lift and the steel wool will clean it away, exposing the clean metal surface of the receiver. In many cases, the original bluing will be visible. Be careful to avoid working an area too much as your effort can actually wear through the original bluing, providing that finish still exists on your gun beneath the surface rust. Always have a thick coating of Kroil on the metal before working it with steel wool. Work one small area at a time. Metal edges and irregular surfaces will require additional attention. Brass bristled brushes are useful in working corners, cracks and irregular surfaces. But they, too, should only be used when a liberal coat of penetrating oil has been applied to the surface of the metal. As the rust disappears and the original surface of the metal is again exposed, this process starts to become exciting and rewarding. Take your time and finish all the details of the exterior of the receiver before working on its interior.
Although the Dremel tool, previously used to remove welding, frequently includes brass brushes, the author discourages their use. The speed of the Dremel tool will rapidly and unintentionally erode any original finish remaining under the rust. Time you may save using a Dremel tool will be offset by your disappointment in the finished product.
If your Maxim has a much thicker coat of rust, two options exist. You may choose to let the Kroil “soak into the rust” by letting the heavily rusted areas sit for 24 hours in a bath of penetrating oil. Then use the steel wool and see if the rust lifts. If fine steel wool has no effect, use a heavier grade steel wool. Some rust conditions justified the use of number one steel wool, with a substantial coating of oil.
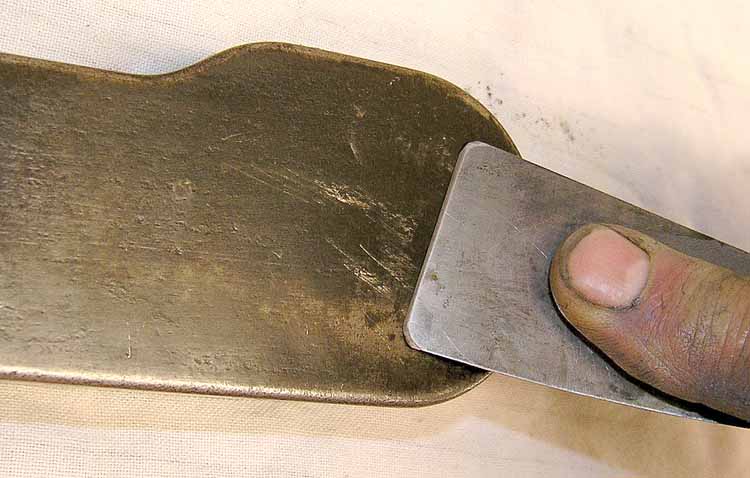
The other option to remove heavy rust calls for the use of a putty knife. Choose a 1 inch wide putty knife. A well-worn putty knife is preferable, with its sharp corners worn into rounded edges. If you only have a new putty knife, use a sharpening stone or sander to dress off the square edges. You want the working edge to be pointed and the corners of the blade to be rounded off so they do not gouge the metal. Apply the penetrating oil and let it soak in overnight to soften the rust. Hold the putty knife at a low angle to the surface of the receiver. Work the blade of the putty knife back and forth to scrape away the rust. As you push it along gently, it will remove rust encrustations. Work a very small area at a time. As you see results, you may choose to apply more pressure to the putty knife, taking advantage of its spring blade. Initially practice on an area that is less visible, until you develop your technique. With patient working of an area, keeping it well oiled, heavy rust can be removed. Generally, with heavy rusting the original bluing is long gone. But the removal of the rust substantially improves the beauty of the gun.
The water jacket on Maxim machine guns, as well as on other water-cooled machine guns, can be the one item that presents philosophical issues. Two of the Maxims I’ve restored still had substantial original green paint on the water jacket. Many of the scratches in that painted surface took place while the guns were being used in action. Do I want to remove that storybook of history? In both cases I did, concluding that the many scratches on the paint would be more of a distraction than an asset. However one grime-covered 08/15 Maxim I spotted years ago in the corner of a machine shop had its water jacket hand painted in the original camouflage used by the Germans in World War I. No matter what condition that painted surface was in, it presented a remarkable opportunity to preserve the story of the gun.
If you choose to remove the painted surface, it generally comes off quite easily by applying carburetor cleaner and wiping the saturated paint off with a clean white rag. Then save this rag in case you choose to match the original German green paint at a later date. Frequently, the blue surface of the water jacket beneath the paint has been protected and remains quite beautiful. If your water jacket is rusty, treat it with the same care you applied to your receiver. Use the brass bristled brush and carburetor cleaner or Kroil as appropriate to clean the detailed corners and fitting attachments. In the process of inspecting and cleaning the entire surface, you will locate manufacturer’s markings and proof marks which can be cleaned with the brass brush for highlighting with white paint as described later in this article.
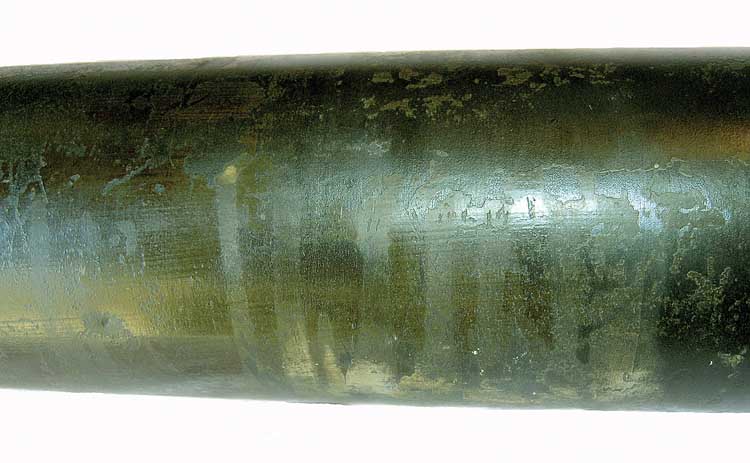
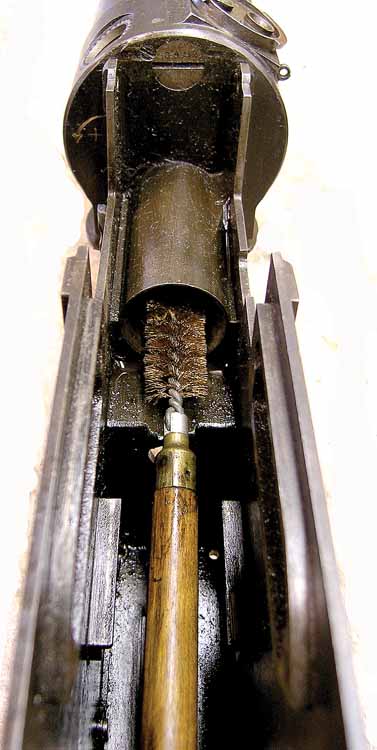
While you are working on the receiver, an area that is easily overlooked needs your attention. The barrel slides into the rear of the trunnion and forms a water-tight seal in this area when appropriate packing material is used. However the first 3 inches of the trunnion’s interior surface must be very smooth or the water seal will fail. The author has used a 12 gauge shotgun brass cleaning brush on a cleaning rod, rotated with an electric drill. Applying Kroil to the area and working the rotating cleaning brush back and forth will clean and smooth out the surface, allowing a tight water seal.
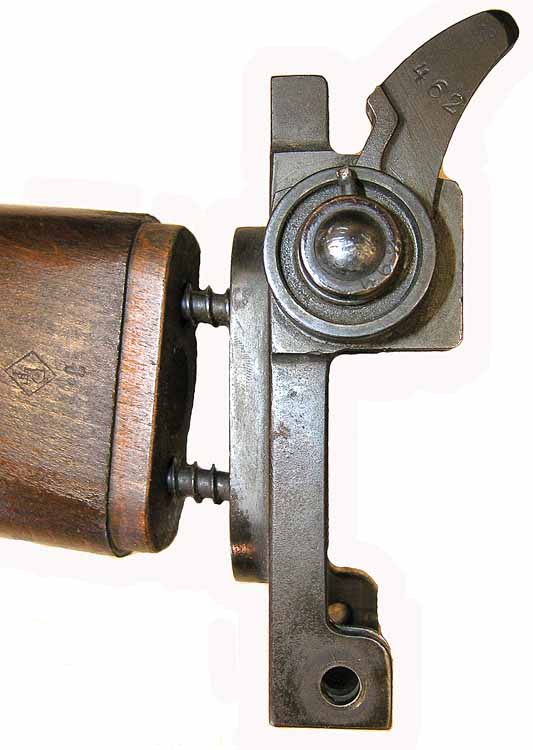
One part of the Maxim that seems to attract rust is the fusee spring cover. Even Maxims with a lot of original bluing remaining on the other parts, have browned fusee spring covers. In part this is because the covers are made of sheet metal. Plus, they protrude from the gun and probably received a lot more rough treatment. Frequently these covers have dents which can be easily removed. Remove the spring from the inside of the cover, leaving the indicator mechanism in place. Rest that dented surface on a hard flat surface like a piece of iron. Place a smaller piece of flat steel or iron over the dent on the inside, tapping it gently with a hammer. With patience, most of the dents can be removed. However you may find that some are not worth risking damage to the overall cover and are best left alone. Use your brass bristled brush to clean the serial number and spring tension indicator markings.
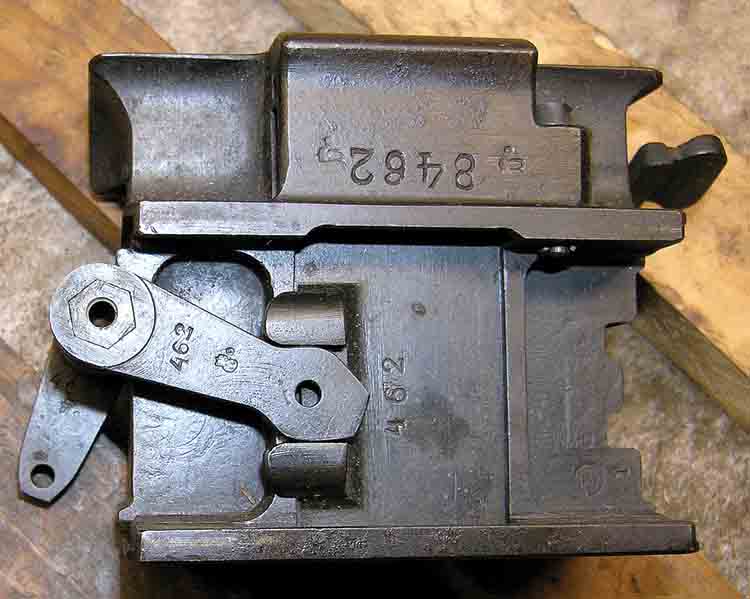
After the rapid progress you made cleaning the water jacket, the feed block will seem very tedious. Its many details create numerous surfaces to catch grime and accumulate rust. So don’t be surprised if you spend an entire evening on this part alone. As mentioned earlier, I chose not to disassemble the feed block out of concern for breaking a part. If your feed block has a broken lower feed arm, the feed block assembly will have to be disassembled to replace that part. So tap the retaining pin out of the lower feed arm shaft using a properly-size punch, and carefully work to separate the upper feed arm from the lower feed arm shaft. Kroil is excellent penetrating oil and may loosen the parts after they have been soaked in it overnight.
To clean the feed block assembly, you may have to soak it in a solvent like paint thinner if it is seriously encrusted with dried grease. Brass brushes of various sizes, toothbrushes and a pointed tool made of a soft material like a piece of brass welding rod (not an ice pick or screwdriver which will scratch the surface) will help in reaching into the many recesses of the feed block. As I cleaned this part, I realized how many hours it took highly-skilled German machinists to make this one assembly. I believe more man hours of competent machinists’ time went into making each Maxim feed block than are required of five M-16s. And certainly more skill.
I treated the lock assembly like the feed block, soaking it in a solvent and then cleaning it intact, rather than disassembling this complicated mechanism. As mentioned before, if you want to disassemble the lock assembly, carefully read that portion of Dolf Goldsmith’s book or enroll in the instructive class offered by Long Mountain Outfitters.
By now you have a good idea how to clean the remainder of your Maxim’s parts. Remove the wood parts from the steel assemblies to which they are attached. Try to remove cotter keys so they can be reused. But if they break, you can obtain new ones at the hardware store. New cotter keys will be longer than needed and will have a modern zinc finish. Choose the appropriate diameter cotter key and cut it to the proper length. You can remove the unsightly zinc finish in one of two ways. The zinc finish will disappear if soaked in a mild solution of muriatic acid for a couple minutes. Use gloves and eye protection. Afterwards, thoroughly wash off the part before oiling it to prevent rust from forming. The second approach is to simply burn it off using the flame of a small torch. Both of these processes create dangerous fumes so avoid breathing the fumes and perform the process outdoors.
Restoring a machine gun is an organized process. By now you have disassembled the complete firearm, degreased each part, removed rust as appropriate and cleaned all of the manufacturer’s markings. Before rushing to reassemble the gun, arrange all the parts in an organized fashion on the clean surface. Reinspect them under a bright light to make sure you did not miss details that will become disappointments after the gun is assembled.
Now is the time to address the missing and the broken parts. You may have been fortunate to have a 100% complete Maxim machine gun. Mine had several deficiencies. It did not have a bipod, so I purchased a reproduction from International Military Antiques, a frequent advertiser in Small Arms Review. My Maxim had lost its muzzle booster/flash hider. The pair of flat springs riveted to the inside of the top cover were broken off. The top cover hinge pin had been replaced with a long bolt and nut. The firing pin was broken. One of the screws holding the steam port cover seal in place had also been broken off. I chose to ignore the broken off screw and found my missing parts on the Internet. I also needed the steam hose and purchased a reproduction from IMA.
The identification marks on a firearm are frequently the only link we have to its personal history. So I chose to highlight these markings. Since I already cleaned each of the markings using the brass brush, I now applied carburetor cleaner and wiped each marking with a clean rag. White enamel paint from a hobby shop was then applied to each marking and the excess wiped off with a rag and a flexible plastic implement. It took several tries to start to get the touch needed to make the end product appear satisfactory. Carburetor cleaner worked well to remove my mistakes so I could try again. The serial number etched into the fusee spring cover was so shallow that it did not take the paint well. Likewise, I was not successful with the most important markings of the gun, those on the top cover. I trust you will develop a better technique than I employed.
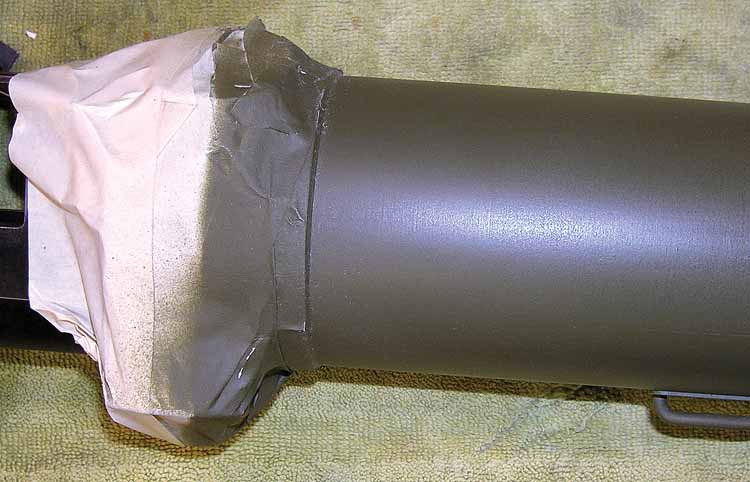
Your next decision concerns the water jacket: do you want to paint it or leave it unpainted? I chose to paint my water jacket and use the same color to paint the bipod. I had saved the rag used to remove the original German green paint from the water jacket. The best match I found for that color was an aerosol spray paint manufactured by Aervoe-Pacific Company of Gardnerville, NV and designated “Camouflage Paint 987 Olive Drab 34087.” Before painting the water jacket, clean it once again with carburetor cleaner and a clean rag. Then use masking tape to mask off the trunnion and receiver as well as the front sight. Spray painting it was the easy part.
The most rewarding step of this entire process is the reassembly of the gun. First oil the surfaces of all of the pieces before you reassemble them. As the pieces come together, you will feel rewarded for all of your hours of patience. If you do not remember how parts were to be reassembled, consult the digital photographs you took as you disassembled your machine gun or study The Devil’s Paintbrush. If you have to force the reassembly of pieces, you are probably doing it incorrectly.
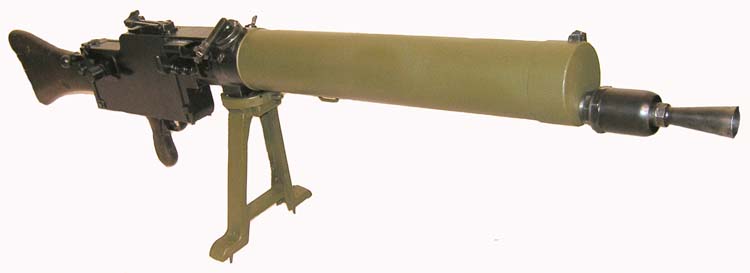
Your completely assembled 08/15 Maxim machine gun is now a piece of beauty.
| This article first appeared in Small Arms Review V14N4 (January 2011) |