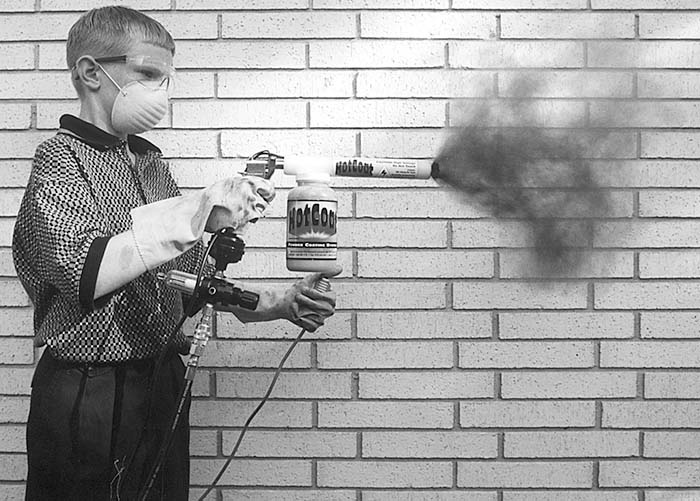

The author’s son, 10 year old Bobby, demonstrates the proper method to apply the powder paint. The correct 8psi air pressure is illustrated by the puff of powder.
By William R. Bishop
Perhaps the single most visible factor when evaluating a legally converted HK full auto firearm is the manner in which it is refinished. Does it have that smooth satin black finish like that of an Oberndorf-produced firearm? Or, much more likely, does it have a grainy black finish which came out of a spray can from the proverbial hardware store? Does this finish obscure small proof marks, become easily abraded, not fully resist all firearms-related chemicals, and have the color shade and sheen which screams “cheap”? Heck, if this is the situation – and it is in so many cases – then are the conversion and associated machine work also of low quality? What else could be wrong with it?
If your HK finish is in this undesired category and you have been searching for a economical way to closely replicate the superb finish from Oberndorf there is now salvation. Coat it via the same electrostatic process the Germans use!
The rest of this article will describe in detail a new product which has recently come on the market and how it is used to duplicate the legendary HK finish. SAR will take you through the entire process as it is applied to an HK 94 semiauto carbine during its conversion to a MP5A2. The end result would make Oberndorf proud and….well…you be the judge of this!
Theory of Operation
Electrostatic spraying is a very straightforward process which HK has used for years on its longarms. An extremely fine grained coating is sprayed from an electrically charged dispenser onto a grounded piece of metal, which then attracts and holds the coating onto its surfaces. It is very similar to static electricity (hence the common name of “electrostatic spraying”) attracting dust to a glass rod. The coated metal is then transferred to an oven and baked for a specific period of time, causing the coating to tightly fuse to the surface. During this curing process the coating becomes self leveling and extremely durable. Also, there is no hazardous waste, little overspray and highly efficient use of the coating material. It is very environmentally friendly.
There are two types of coatings which are typically used in this electrostatic process: 1) liquid coatings which are sprayed at 35-50psi and require up to 80KV DC to charge the particles; and, 2) powder coatings which are sprayed at 5-10psi and a 9KV DC rate. The functional difference (hardness, bond, appearance, etc.) between the two coating methods is quite small. The main difference is cost, as the liquid method outfits go from $4000-7000 and require stronger electrical current, higher rated compressors and fairly specialized equipment. The powder method requires significantly less of everything, but, when compared to the liquid method has a fairly limited range of color availability.
HK uses a two-part epoxy liquid finish for its electrostatic painting. This method yields a beautiful coating which is recognized around the world. But, it requires very expensive equipment which is beyond the range of practically all individuals and most shops in the United States. The alternative to this – the powder method – has not been available at a cost effective level…until now.
Another name for this powder method of electrostatic painting is “powder coating” and this process has finally become available for our use at home. Most importantly, a color is now available we sure can use and at a cost we can afford. In short, we can now almost duplicate the HK finishing process by using the much lower cost powder coating method of electrostatic spraying!
The Powder Coating Kit
The Eastwood Company of Malvern, PA is very well known in automotive circles for their unique line of products in the areas of restoration and repair. As a member of an automotive club, I had heard about this revolutionary product which was the answer to many restorer’s demands. I was also in the process of converting my HK94 carbine to full MP5A2 specs and had long dreamed of finishing via the HK factory process. Could the Eastwood kit be the answer to my prayers? A phone call to Eastwood had their “Hot Coat” powder coating outfit on the way to me.
What arrived was a well designed unit which looked sort of funky, but, the very complete instructions (read them first!!!) began to dispel my concerns. I had already received from them several paint chips to determine which one was closest to HK satin black. Fortunately, their #10103 powder proved to be an almost exact color match to the factory finish of a late production MP5.
After reading the instructions several times – I was not about to mess up my expensive HK 94 or get zapped by 110v house current – it was time to go. But first, an overview about the conversion process to MP5 specifications, as several C2’s out there really deserve some recognition for the skills and service they provided.
The Conversion
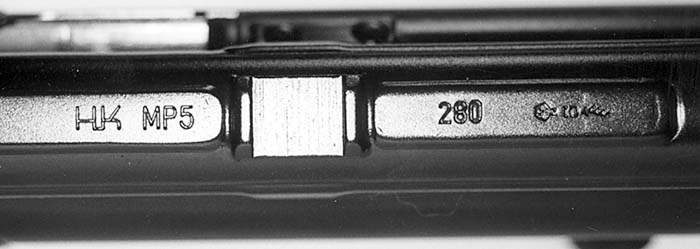
I had a S&H Arms of OK registered sear already installed in a HK94 trigger pack and wanted my HK94 carbine converted to as-near-to-factory specifications as possible. The first step in my conversion process was to get it remarked. Ron Moyer of Class Three Supply told me they owned a $5,000 New Hermes engraving machine with a 7-way fully adjustable bed. The key words were “fully adjustable bed” as it could positively retain the HK94 at any required angle throughout the engraving process. Further, Ron guaranteed the MIG welding of the existing HK94 script, surface milling the receiver flat, and remarking with “HK MP5” would be to precise Oberndorf standard. Well now! After viewing many remarked MP5’s which ranged from crudely hand stamped to near-perfect engraving, this seemed to be a bold statement.
But…Ron was 100% good on his word with the final marking of “HK MP5” even neater than HK could do! Clearly, Class Three Supply has set the standard for welding/remarking the HK 91/93/94 series of weapons.
Now it was time to gather up the conversion parts. Considering the market value of a fully transferable MP5, I deliberately chose to use all German parts for my conversion. The cost would be high, but the increase in value would offset it. Once again, Class Three Supply came to the rescue with an SEF plastic lower, front sling pin, true MP5 (not G3) paddle mag release, and spare locking pin for use as a fake push pin. Emails to “Jack at Public Safety” yielded a German MP5 bolt carrier while “Bob T.” produced a new-take-off German MP5 8.85” lugged barrel. Time for the actual conversion to be done.
I had heard many good reports on the work which Joe Gaddini of SWR was doing and gave him a call about my project. We agreed he would perform the barrel replacement/headspacing, milling the SEF plastic lower to fit the semiauto HK94 receiver, installation of the pseudo SEF locking pin, installation of the MP5 paddle mag release, and bead blast/parkerize the entire receiver. He would then ship it back to me for the final powder coating and reassembly.
Everything was collected and forwarded to Joe for his use…and…Joe did a 100% superb job to absolute factory standard. There was not one slight thing which was out of place or incorrect. Turnaround time was one month – this alone is darn near a miracle – while his costs were very competitive.
The barrel was pressed into place/headspaced at the optimum .015” and the lug pointed exactly towards 12 o’clock; the new sling pin was straight and its head was flared to standard. The cocking tube was precisely centered into the front sight assembly and the SEF plastic lower was carefully milled out to firmly fit onto the receiver. Its fake push pin was neatly sliced and epoxied into place. As requested, the head of the pin was on the left and the spring tip was on the right so it matches the two real locking pins The paddle mag release was installed into its blind drilled hole and then the insertion hole was filled with stainless steel. Joe then stoned this area to be exactly flush with the receiver. Finally, the bead blasting and parkerizing was completed and to the same color as a German factory MP5.
In my opinion, having seen numerous HK conversions, Joe Gaddini’s MP5 work exceeded my strictest demands and rises to the level of artwork. It is that good. Powder coating time!
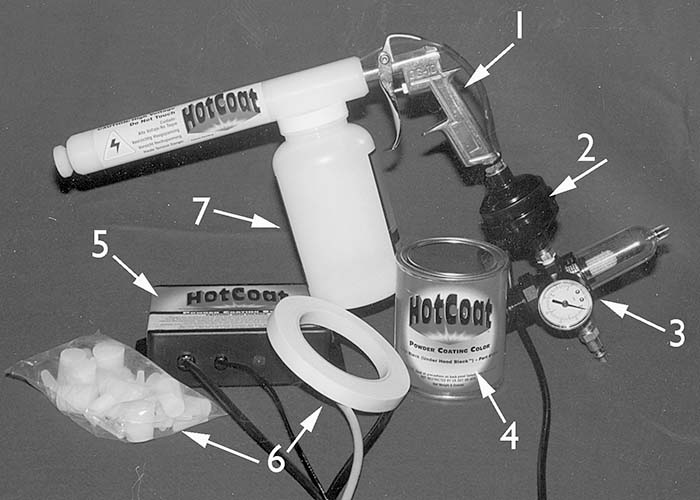
Description of the Hot Coat System
The Hot Coat powder coating system is well built of plastic and metal. It is comprised of the paint gun itself and a 120V DC power unit. This unit has three cables: 1) one running from the power unit to the gun and supplying 9KV DC; 2) one to the target part and acting as the ground clip; and, 3) one to the push button activation switch. Finally, a can of #10107 high gloss black powder paint is included with the kit. If you talk with Eastwood be sure to ask if they can substitute a can of satin black #10103 for the semi-gloss black. But, as extra powder paint is only $10 per can, it is just as well to order the satin black separately and give yourself a wider color range.
A very well written and complete booklet of instructions comes with the Hot Coat system. The main thought behind the instructions is quite simple: this is a straightforward process to do, but it must be done safely. You will be dealing with 110V house current which is normally not deadly, but can give a nasty shock. (Editor’s note: 110v current can easily kill you if it grounds out through your body passing vital organs-Dan) Also, the paint is a very finely ground polyester powder and as such can be explosive if allowed to build up into too great an aerial concentration…sort of like the old “dust bomb” we learned to make at Special Forces school. For this reason, no flames or spark should be in the area of painting. Pilot lights from hot water heaters, extraneous sparks, cigarettes, etc. are to be avoided. This means the oven performing the thermal curing must be electric and not gas. Finally, the instructions specifically state this oven should not be used for food service. More on this later!
A few extra supplies you should get from Eastwood will include some of their special Hot Coat moisture filters, high temperature silicone plugs and fiberglass masking tape. Total cost for all this is less than $225 for a kit that will last for years. Plus, the tape and plugs can be used for other related gunsmithing services (molycoating, parkerizing, etc.) and further reduce costs.
Preparation for Powder Coating
The absolute surest guarantee of a first class powder coating job is surface preparation. It is that simple. My MP5 had all removable parts including the front sight blade, rear sight assembly, cocking handle/support, front end cap and most of the mag well locking assembly stripped from the receiver. The only parts which could not be removed were the flapper mag lever itself and its 1/8” stainless steel axis pin. These were permanently installed and would require masking.
After stripping the receiver, it took almost two hours to thoroughly degrease it. This very critical process was accomplished by painting it with acetone via an acid brush, letting the solvent evaporate, and then warming it in an oven for 10 minutes at 150F. This caused the remaining oil to creep out of the metal’s pores and internal crevices. After 6-8 trips from the oven, to degreasing, and then back to the oven, all oil had flowed out and left behind a totally bone dry receiver. Particular attention was paid to the rear sight flat, front sight/barrel mount point and especially the barrel trunnion areas. This trunnion area was very time consuming to degrease as the heat seemed to bring out a never-ending supply of oil trapped between itself and the receiver shell. But, this tedious process must be done to achieve a properly prepared surface.
As the painted receiver would be thermally cured at 400F for 15 minutes, the traditional masks of newspaper and tape would not apply. The temperature would be too near their ignition point (paper burns at 454F according to Ray Bradbury) to take any chances of combustion. To eliminate this worry I used Eastwood’s previously mentioned fiberglass masking tape and high temperature silicone plugs. Also, standard aluminum foil is used instead of newspaper to fill up the larger cavities and protect them from errant overspray.
Start the masking process by putting on a pair of vinyl or nitrile gloves so that no skin oils can accidentally get onto the prepared surface. Next, insert a 1/4” unfinished wood dowel rod through the muzzle and all the way out the other end of the receiver. Cut it off so that about 4” sticks out from both sides as this will be the primary means of handling the receiver and suspending it in the oven. Carefully tape off that portion of the lugged barrel which will not be painted. When doing so, continue the taping so that it secures in place the dowel rod extending from the muzzle. We do not want the rod to slip and that precious receiver to drop!
Now, use a combination of aluminum foil and fiberglass tape to mask off the rest of the receiver. Pay particular attention to the mag well area and very carefully mask the mag release lever . Factory MP5’s have about .25” overspray into the well and absolutely none on the lever itself. The rear of the receiver is sealed off and no more than .10” of overspray should intrude. The bottom of the receiver where the SEF plastic lower fits should allow only about .10” overspray. The only other part to coat is the front end cap, which is easily taped off so the visible front portion is left exposed. Take your time and figure that about an hour will be required to do it all correctly.
Now, the final step before the actual painting is to take some unfinished stove wire, or Eastwood’s stainless steel safety wire, and rig it to both ends of the dowel sticking out of the receiver so it can be suspended from the top rack of the electric oven. Run another piece of wire through the tape that is masking the front end cap. Do a test hang to verify the receiver and cap will touch nothing during the upcoming thermal curing and also to give them one last warming/acetone degreasing. By now, there should not be any evidence of oil seeping out! When you pull them out of the oven for the last time before powder coating, turn the thermostat up to 400F so it can heat up while you are painting.
Powder Coating
The paint gun is first adjusted to achieve the correct pressure before any painting is ever done. My 3.5HP Sanborn 115V compressor has both a pressure regulator and Campbell Hausfeld water trap installed, plus, I used the optional moisture filter which Eastwood has available for the Hot Coat gun. A third water trap consisting of a Norgren trap/pressure regulator was directly attached to the sprayer. The air must be dry when dealing with such fine powder! Adjust the pressure so that no more than 10psi is coming out. 8psi is the optimum pressure as you want a wafting of powder to come out and form a charged fog around the target part. Too much pressure will simply blow the powder past the part and also blow off any powder which did hit the part. Once again, you want a fog – and low pressure is the answer. The minimum pressure which the gun can correctly use is .5cfm at 5-10psi…pretty low pressure!
Once the pressure is adjusted to 8-10psi, take the powder and carefully pour it from the can into the cup, using a cone of glossy paper, to a level of 1-2” deep. Do a test spray into the air to make sure the pressure delivers a fog and not a hard spray. Adjust the regulator as necessary to achieve the fog.
Now, suspend the masked/degreased receiver and end cap from an overhead support. I used 550 paracord as it is strong, cheap and available. Any support such as a broomstick, dowel rod, 2×4 lumber, etc. is OK. With the Hot Coat power unit plugged into a grounded 110V outlet, attach the ground clip to the receiver. I attached mine to the underside of the rear locking pin bushing.
Let’s see…the pressure is tested and powder fogs out…the power unit is plugged in…the receiver is grounded…let’s go.
Press the button on the activation switch and a second later squeeze the trigger on the paint gun. Air pressure flows through the gun and mixes with the powder in the cup. The fluidized powder flows up from the cup and down the emitter tube where it receives a positive charge. When the paint exits the end of the gun it forms a black fog immediately to the front. At the same time, the clip attached to the receiver has caused it to become grounded so the fog is gently sucked down onto the negatively charged metal. It is truly amazing to watch how this fog seems to blow out of the gun and then slowly change its direction to attach itself to the part.
Be sure to direct your immediate attention to the various nooks and crannies on the receiver, such as the rail areas, so they get painted first. This helps avoid a too thick buildup of the powder in adjacent areas by the end of the job. Paint in a circular pattern and coat everything evenly from several different angles. Typically, the distance from the emitter to the part is about 6” – pretty close, so do not accidentally touch the emitter to the part. After a minute, release the activation button and carefully inspect the receiver for powder thickness. If it settles too much in one area, simply tap the part with a wooden implement so that any loose powder shakes down to a lesser coated area. Over the next few minutes continue this process of painting the receiver, stopping to inspect, shake/tap if necessary, and proceed with more powder. After about five minutes you will be completed when the receiver is evenly coated with a matte covering. Release the activation button, unhook the receiver’s ground clip and give that exposed area one last fog of powder to coat it.
Attach the power clip to the front end cap and proceed with the same process. It goes very fast and is done in less than 15 seconds. When finished, release the activation button and remove the ground clip; give the exposed area a final fog. Unplug the power unit, discharge the emitter tip to the ground clip, put down the gun and you are finished powder coating your almost-completed MP5.
Thermal Curing
Carefully pick up the receiver/end cap and take them to the electric oven, ensuring to not bump anything or allow wind flow to disturb the charged powder. Hang them via the support wires from the top rack and close the door. As the oven should have already been preheated to 400F all there is to do is wait for magic to happen. Watch through the viewing glass until the powder on the parts has “flowed out” and the entire surface of both parts has a shiny wet appearance. As it is significantly smaller, the end cap will flow out first and then the receiver. For me, flow out occurred at the one minute point. Now, turn on an accurate timer for precisely 15 more minutes.
At the end of 15 minutes immediately turn off the heat, open the door and let everything naturally cool down. Do not breathe the fumes which come roiling out!!! Let the temperature stabilize over the next 10 minutes while inspecting them for any thin spots or imperfections. If there are – there probably will not be – then simply respray and repeat the process. Final thought on the oven: if you cheated and used a food service electric or toaster oven (some of you will), thoroughly clean it and ventilate the house before the wife returns. The gaseous fumes (isocyanide, I believe) given off by the curing will gag a maggot. Walter T. Birdsong of “Black T” fame very seriously advised to get an old oven and use it in the garage as the curing fumes can embed themselves into the wall of the oven. This is excellent advice from an industry leader in firearms refinishing. I now have two used ovens sitting in my shop for future use. The following warnings are located in the instruction manual and should be followed:
“Always cure powder in a well-ventilated area and wear an activated charcoal respirator while curing to protect against unpleasant fumes. Once the curing is complete, allow the part to cool down gradually by turning the oven off and opening the door slightly.”
Page 12, the Eastwood Company “Hotcoat” Instruction Booklet, Rev 5/99
“Do not use an oven used for food preparation or located in a living area, as mildly toxic fumes are given off by the powder residue during the curing process! Do not use a gas oven!”
Page 4, the Eastwood Company “Hotcoat” Instruction Booklet, Rev 5/99
After the parts have completed cooling, remove all the masking and be amazed at the results. Carefully oil/reassemble everything and you now are the proud owner of a MP5 which equals the beauty of HK/Oberndorf’s output. Truly, a factory-correct finish which gleams like a satin black jewel.
Conclusion
The Hot Coat powder coating outfit from Eastwood is a quality product which delivers a first class finish and is well within the budget of practically all home hobbyists. By following the detailed instructions and properly preparing the target surface it delivers a coating which closely replicates that produced by HK Oberndorf. As shown in this article, when the Hot Coat system is applied over an HK94 receiver – which has been converted by professionals such as Class Three Supply and SWR – you are assured of a highest quality weapon which yields increased market value…and years of first rate service.
Where to now? Well, the #10103 satin black powder is perfect for refinishing so many of our most popular C3 items out there. The IMI Uzi, FN FAL, Belgian FAL and FNC magazines, 9mm/.22RF suppressor tubes, etc. immediately come to mind as excellent candidates. You are only limited by the size of the electric oven, ensuring the parts can be electrically charged and tolerate 400F heat, and your imagination. And SAR readers are noted for having large imaginations!
The Eastwood Company
Box 296
Malvern, PA 19355-0296
(800) 345-1178
Class Three Supply
Attn: Ron Moyer
1400 N. Hermitage Road
PO Box 1119
Hermitage, PA 16148
(724) 962-1890
SWR
Attn: Joe Gaddini
119 Davis Road
Suite G-1
Martinez, GA 30907
(706) 869-0026
| This article first appeared in Small Arms Review V3N8 (May 2000) |